Prepress Guidelines
Finalizing Your Art and Preparing for Output
Saving Your Files
Illustrator documents must be saved as EPS files, with an 8-bit/Macintosh preview and Illustrator compatibility (select the version you worked in, unless your job has a backward compatibility problem; i.e., conflicting Pantone names).
Upon Completion of Art
Books:
Upon completion of art, supply your publisher with all original materials and appropriate proof, with the proof stapled on the front above the reference material. For black and white jobs this proof consists of a laser print. For 2-color or 4-color jobs, it consists of EITHER a color proof OR a black and white laser composite proof plus black and white separations.
New proof is required whenever a correction is made. Always add the latest proof in FRONT of all previous material and staple the resulting pack together. In this way the entire history of each figure remains intact at all times.
When final approval for output has been given, you will be asked to send a disk and directory (see Disk Handling). If color proofs have been provided throughout, we will need separations for 2-color art only. If lasers and seps of the APPROVED artwork have been provided previously, we will ask for color if you have the capability. Provide whatever is requested within two working days of notification. Do not send disks until requested.
NOTE: All separations must show register marks and color information!
Clinics (accompanied by a blue transmittal slip):
Always return completed artwork with a laser proof, disk, and directory (see Disk Handling). If there is time to send correction passes back to you, the disk will accompany the work.
All Corrections:
Remember to change the date and check the revisions box on the illustration label!
Preparing for Output
Once the illustration is finished, make sure "preview" is selected in layer options for all layers and that all layers are unlocked and showing. Likewise all art elements must be unlocked
and showing. If preparing a file with an EMBEDDED TIFF(.tif), remember to flatten layers BEFORE EMBEDDING. Then, set up art layers in descending order so that labels are on top(front), second the
leaders, symbols, arrows; third the embedded lineart image, then the colored art, and finally grey art on the bottom.
Do not flatten layers. (see Adding Color and/or Labels to Scans)
Confirm that no art elements or guides extend beyond the art area and that any stray points have been deleted. Failure to do this may cause outputting problems with some typesetting/layout systems. Remember it is your responsibility to provide properly constructed files that will incorporate into these systems correctly.
Disk Handling
 Disks must always be
accompanied by a directory of the contents. Place files on the disk within a folder named with the author's name and ISBN. On a Macintosh, use the "Print Window" command to make a hard copy.
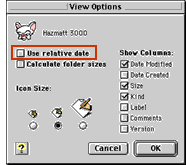
Choose "View Options" and deselect "relative date." We need to see dates on the directory, not "Today" or
"Yesterday."
Windows users should right click on the Start button and select "Explore." Under the "All Folders" pane, open the disk you wish to view by clicking on the plus sign. Open the folder containing files by clicking on its plus sign as well. Press the "Print Screen" function key to make a copy of the screen. Open a program that will accept .bmp files (such as Photoshop, Paint, or Word) and paste the screen shot into a new document. Print this file and include it with your removable media.

We accept CD ROMs, 100 MB and 250 MB Zip disks, 1 GB Jaz disks, and DVDs. Floppies are accepted but highly discouraged.
Do not place more than one job on one disk. The rule is "one author–one disk." If this is not feasible, call your contact.
Disks must be marked with proper identification. Include the name of the publishing company for whom you are doing the work and the appropriate department or person within the company (this prevents loss of the disk at the comp). Include your own name so that we can return your disks to you. If you fail to identify disks properly, they become the property of the publisher.
We will not accept disks with labels layered one on top of another. Remove the old label before adhering a fresh one. Multiple label thicknesses can damage drives, as it can cause peeling, sticking, and tearing.
If files need to be compressed to fit on disks, use Stuffit Deluxe or Stuffit Standard Edition for Mac files, or WinZip for PC files. Files sent to your contact via Email or FTP MUST be compressed with one of these programs.
Compensation
Once all material has been received and the output approved you will be compensated. Remember, you are responsible if the file does not output or print properly due to poor construction.
Maintaining Files
You may be asked to supply copies of your jobs at any time up until the book is actually printed. It is your responsibility to maintain these files in good condition, so it is important to keep backups of all your work. For information on published books, call or Email your contact.
~ Prepress Guidelines ~ Multimedia Guidelines ~
~ Introduction ~